# How to make your AI art move with PhotoVibrance
### Unlock the power of AI art and animation using PhotoVibrance.
In this article, you’ll learn the ins and outs of creating irresistible, scroll-stopping content that breathes life into static images. Not just a boring tutorial, I’ll share my personal trials and triumphs with the software, arming you with the wisdom you need to master this digital wizardry.
Read how to create dynamic content that catches the eye and keeps your audience engaged, using features like **Magic Motion** and **3D Parallax**. I’ll reveal the pros *and cons* of **PhotoVibrance**, with my own experience of learning to use it. Ready to add some vibrance to your images? Let’s go!
### Why you need to start animating your AI generated images
I have a riddle for you: what’s in constant motion but stays perfectly still?
Well, I was thinking **a static image with animated after effects**. But if you said *“a tree. Because its branches and leaves move with the wind, yet the tree stays rooted in the same spot” (*or *“a clock’s hands”)* the same rule applies.
In social media, online marketing, or blogging, we face a dilemma: how to stop the scroll and stand out from the crowd, but without beating readers over the head with flashing lights. We don’t want them to run away screaming from bad UI/UX. We want to gently reset their attention:
AI art animated loop with PhotoVibrance. Try it here.
It takes simple, stimulating visuals to break up the endless horizon of continuous scrolling. Simply put, we want to be that tree in the wind.
### Creating dynamic content with AI art and animation
After experimenting with different tools, I found that adding after effects with animation using [**PhotoVibrance**](https://aff.vidello.com/28994/139901) made my AI images more dynamic. Full disclosure: I didn’t like it at first! I tried out **PhotoVibrance** last year, and ended up taking advantage of the **30 day refund**. However I remained curious and intrigued and came back this year to find that it *is* easy to use.
You just have to get the knack!
I must admit, my initial skepticism about **PhotoVibrance** transformed into admiration for its capabilities. Whether you’re a seasoned graphic designer or a beginner blogger, this tool can bring your digital content to life. You may need a bit of practice to get the hang of it, but trust me, it’s worth it.
There are two main animation effects in PhotoVibrance: **Magic Motion** and **3D Parallax**. Magic Motion is the easiest, so let’s start our adventure there!
Magic Motion allows you to make loops from any image. These would work great as a background for a **YouTube** video, especially a guided meditation or mindfulness video, with soothing audio. The best images for Magic Motion are those with natural moving features, like water, sand, clouds, fire, even hair or fur. Wind moving through grass can have a nice effect.
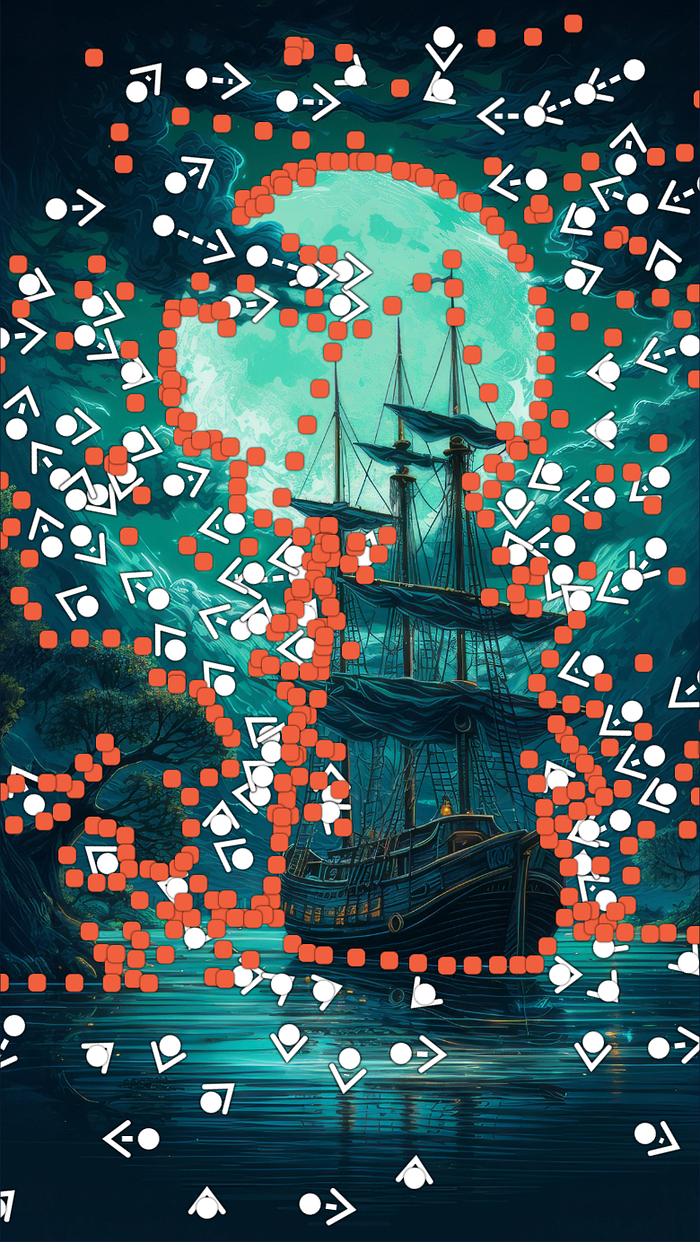
Basically it works by assigning “Anchors” to points you want to stay still. It’s best to animate just a single element, and let your living pictures “breathe”.
The areas you want to move are filled in with “Arrows”. As with anchors, you can drop these in individually, or draw a line and it will fill them in.
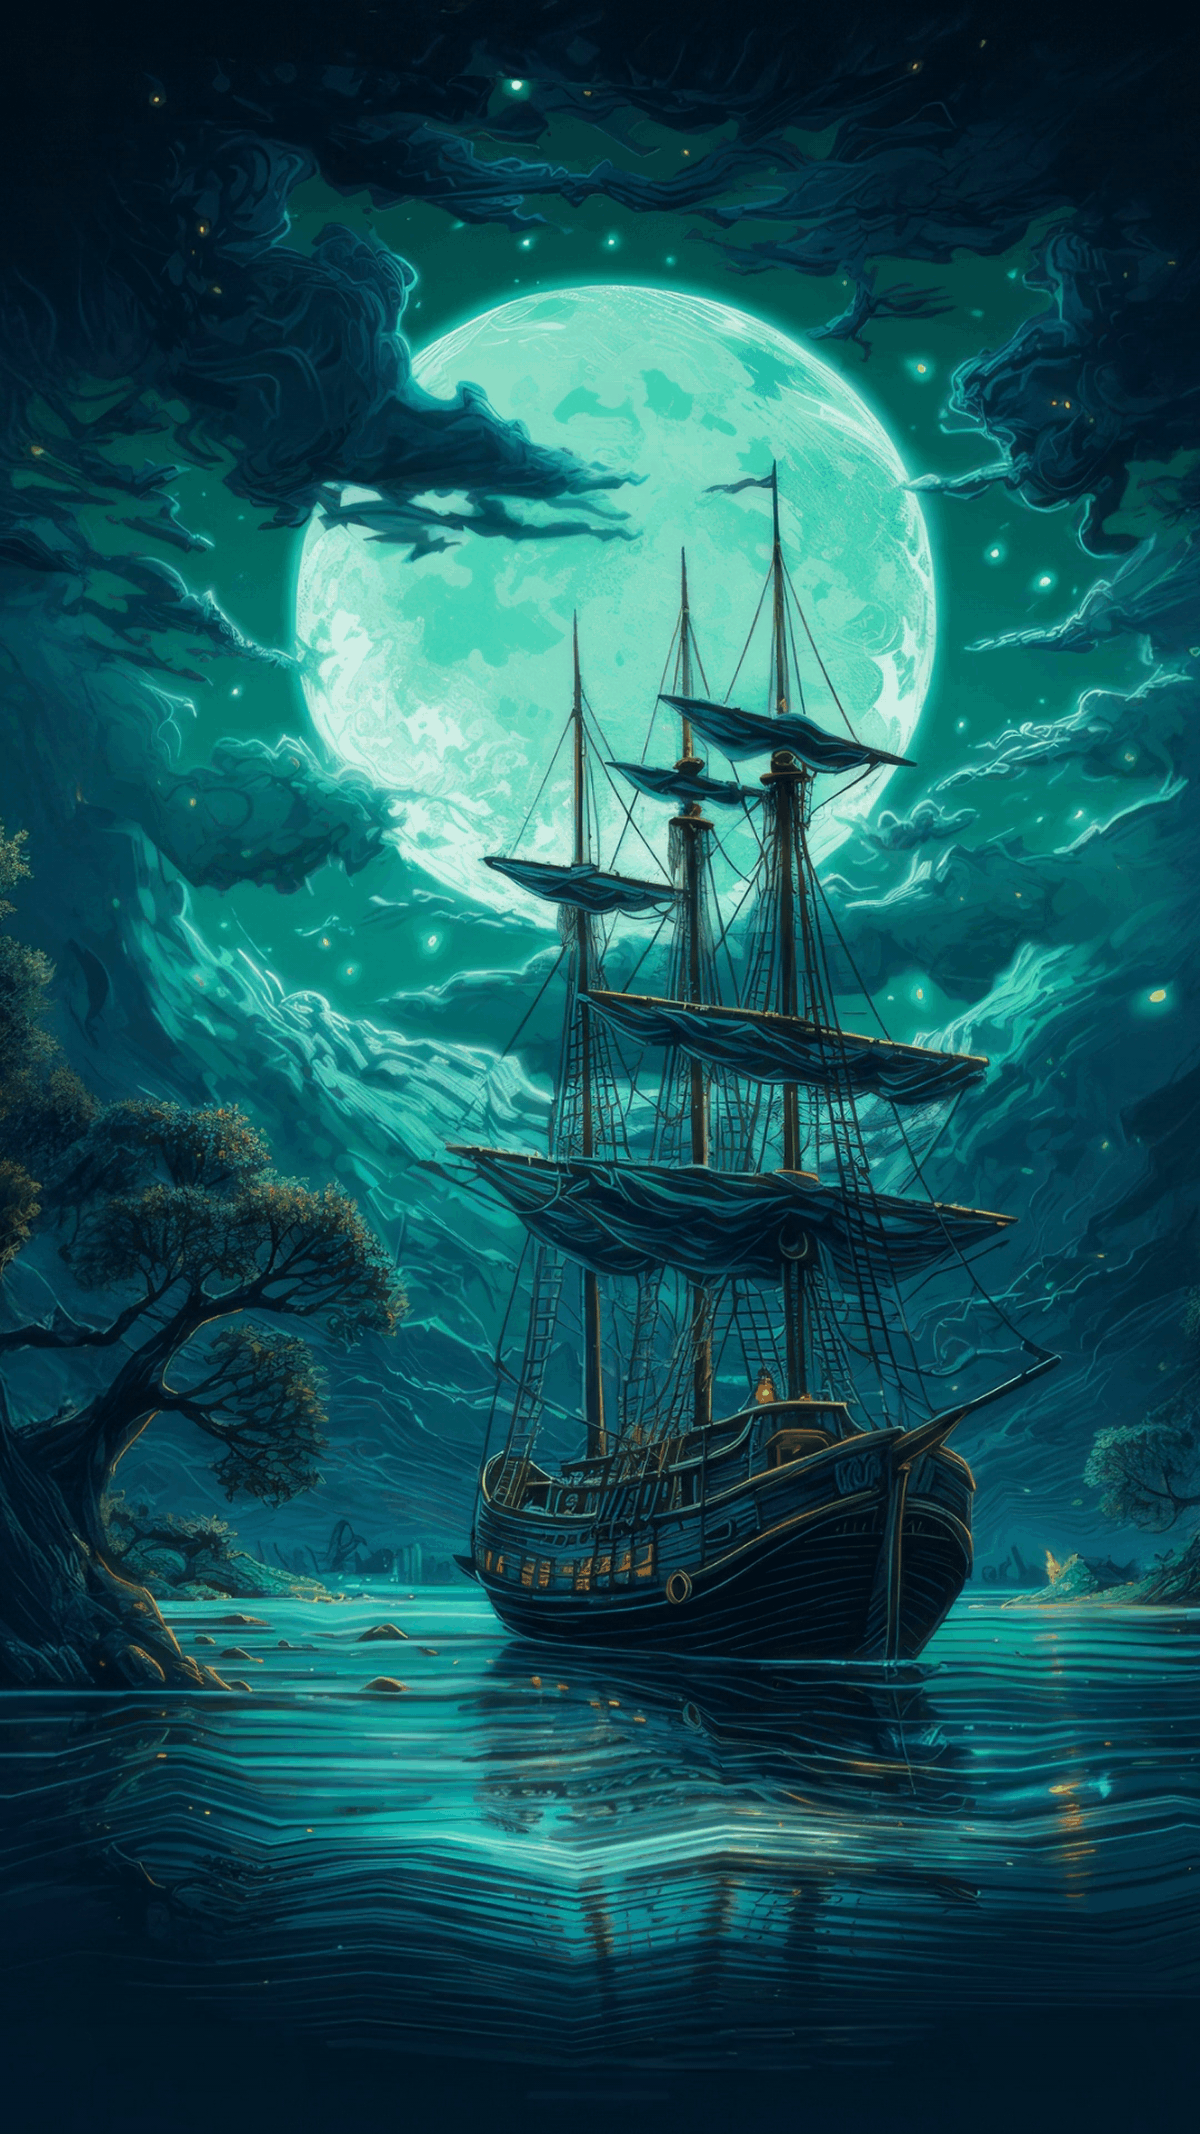
Here’s my behind-the-scenes for the “Pirate ship in Neverland” image above. Note that I’ve actually gone a bit overboard (no pun intended!) in this one, because I had so many stars in the sky that I wanted to keep in place. So I had to pinpoint a lot of stars, and move the clouds around them. It may look complicated, but it was just a few minutes trial and error, with a simple touch. I actually used a [**Wacom Intuous**](https://amzn.to/3DeGg4A) to make the process easier:
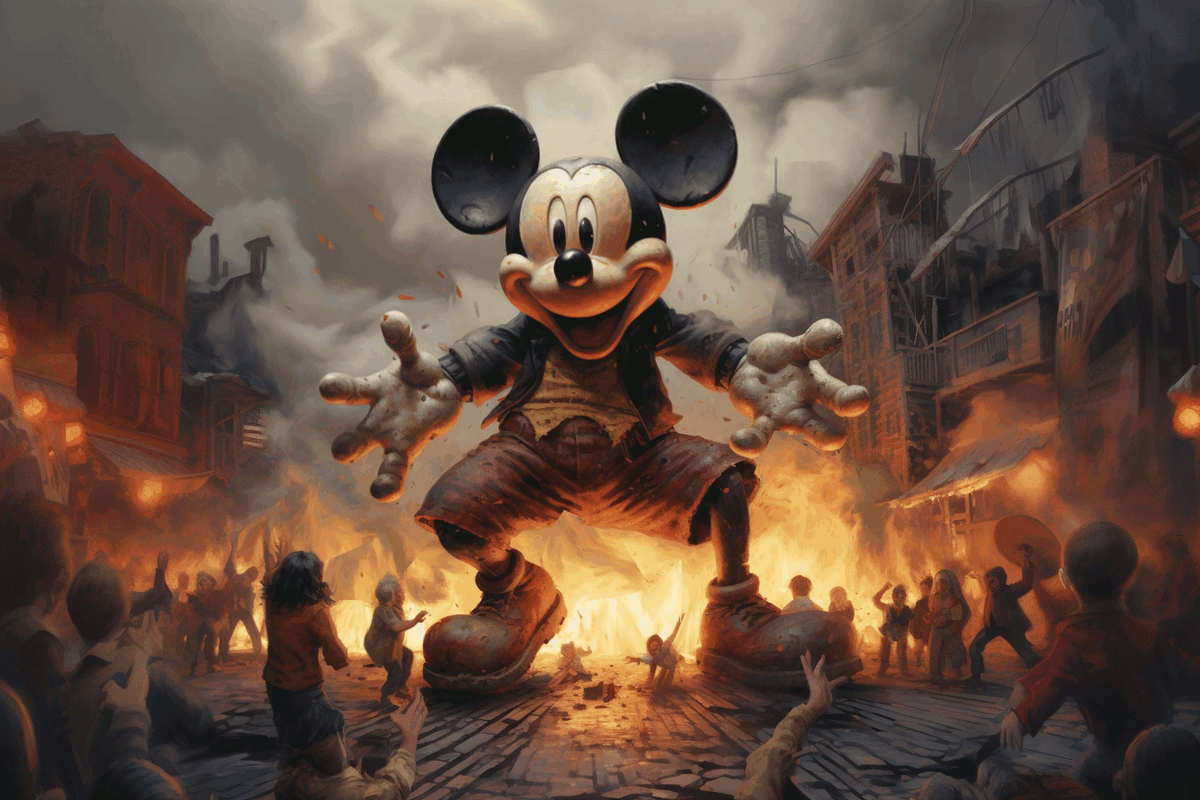
It was a simple matter of tracing the moon, the ship, and the shore. Adding in the stars, and then drawing where I wanted motion. With a little practice it’s incredibly fast, and you could do much fewer points if you wanted. Even a few Arrows are enough to make an eyecatching effect. Once you have the hang of it, the skies the limit! I used it to make a rampaging Mickey Mouse:
Oh, did I not mention yet? You can add special effects and overlays like:
* **Bokeh**
* **Bubbles**
* **Fireworks**
* **Confetti**
* **Dollar signs**
* **Christmas magic**
* **Glitter**
* **Fog**
* **Leaves**
* **Lens flare**
* **Neon borders**
* **Rain**
* **Petals**
* **Smoke**
* **Snow**
* **Love hearts**
* **Shooting stars?**
Well, you can! And more than I can list. There are cool pre-animated objects you can drag and drop into your creations too, like butterflies, sportsballs and rainbows. These all add even more movement, so you don’t have to rely on just what’s in your image (in fact, it’s better to add these in).
### Prompting the ideal AI images for Magic Motion in [PhotoVibrance](https://aff.vidello.com/28994/139901)
You can use Royalty Free images within the software (**Pexels** and **Pixabay** are fully integrated), but you all know I love using AI to generate images!
Think about what you’d like to move. You don’t need to conceptualize in 3D (that’s more for the Parallax animation effect, more below). So don’t worry about foreground, background etc just yet. Think more about textures. This can be in the background (like a moving thunderstorm) or the subject. I’ve seen a beautiful portrait with little depth but amazing ripples of sunlight.
Ideally you want to find something in your image that can “flow”. And then layer other elements over the top for more visual interest, and to break up the hypnotic smooth movement (unless that’s the feeling you’re going for).
Warning: the seamless looping can be mesmerising! You can also stagger the speed of the motion and any elements, which helps differentiate (see the fireworks in my Mickey Mouse Godzilla-ing his way through Main St).
I could continue listing all the objects and particles you can add, but you’re better checking them out yourself and seeing what sparks your creativity.
I’m an affiliate, but I tell the truth (more on this below), so take it for a test with the confidence that you have a 30-day money-back guarantee period. I’ve used it before myself (but now that I “get” how to use PhotoVibrance, I’m back and sticking around with its $39 lifetime, one-time-payment).
Okay, remember I said I’d tell the truth? I don’t love Parallax. Here’s why:
**It’s fiddly.** First you have to cut layers (much easier to do this in **Photoshop** and import), and then position them like a popup book or a scenic canvas. Actually I enjoy the popup stage, and it’s fun moving the virtual camera.
The problem comes when you need to record the frames. Basically you position the camera, then reposition it, and it automatically tracks the movement. Should be easy, right? Well, it’s not. Copying frames is very temperamental, and it gets glitchy. It’s hard to reset, and you can’t easily edit a camera position (you have to delete the frame). I got frustrated.
Here’s what I did using a bookcover I had on hand ($1 Million idea: “Living book covers!” for online bookshops). You can see I got creative with angles:
Okay, actually I’m pretty proud of that. But I can do a similar thing using Leia Pix. Admittedly this is less dynamic, but I did it in a tenth the time:
I’ll leave it for you to decide if the extra camera mobility and being able to set funky keyframes is worth it. I can think of clever ways you could use camera angle to occlude and then suddenly reveal information, and **PhotoVibrance** does allow you to have text swipe in (great for adverts).
Yes, even if you don’t use Parallax much (I know I won’t!). What I will say is that the ability to transform static images into living ones is great for social media. In an ever-scrolling online landscape, you have to move to be seen.
GIFs are a great way to encourage and reward readership. GIFs can be set as featured images (and seem to show up on Medium) but appear as static images on Twitter, Facebook, Pinterest, Instagram, and now, Threads. But you can use animated images on social media, and then link to your article.
I plan to use some form of movement in all my cover images for Medium articles, whether it’s Magic Motion or an **AI depth converter** like Leia AI.
**TOP TIP:** Medium will distort the featured image in story listings if it is a GIF (rather than crop it like normal, even if you set a focus point with Option + F). To avoid the stretch, you may want to widen your art: